
1. Meet Muvloom
1.1 What Muvloom is
Muvloom is an AI image and video studio that runs in your browser. Describe the picture you want in one sentence and it generates the image; then keep editing it on an infinite canvas, or hand it to the AI agent so it drafts the prompt, reworks the image and produces a whole set of assets.
Nothing to install, no design background needed. Product hero images, posters, social media visuals, character sheets, product scene shots — every one of them starts from a sentence.
1.2 What you can do with it
One line, one image
Describe the picture, pick a model and a ratio, get several images in one run.
Reference images and inpainting
Upload references for image-to-image, and repaint only the part you paint over.
Infinite canvas
Lay images out, circle things, write notes, and generate new versions beside the original.
AI agent
It writes the prompt first and generates after you confirm; built-in skills for e-commerce, posters and more.
Video
Make an image move, extend it, edit it, and cut the clips into a film.
Inspiration, assets and templates
Borrow good prompts from others, and keep the images and looks you use often.
1.3 A tour of the interface
Open the Muvloom home page (the Create page) and you will see these areas:
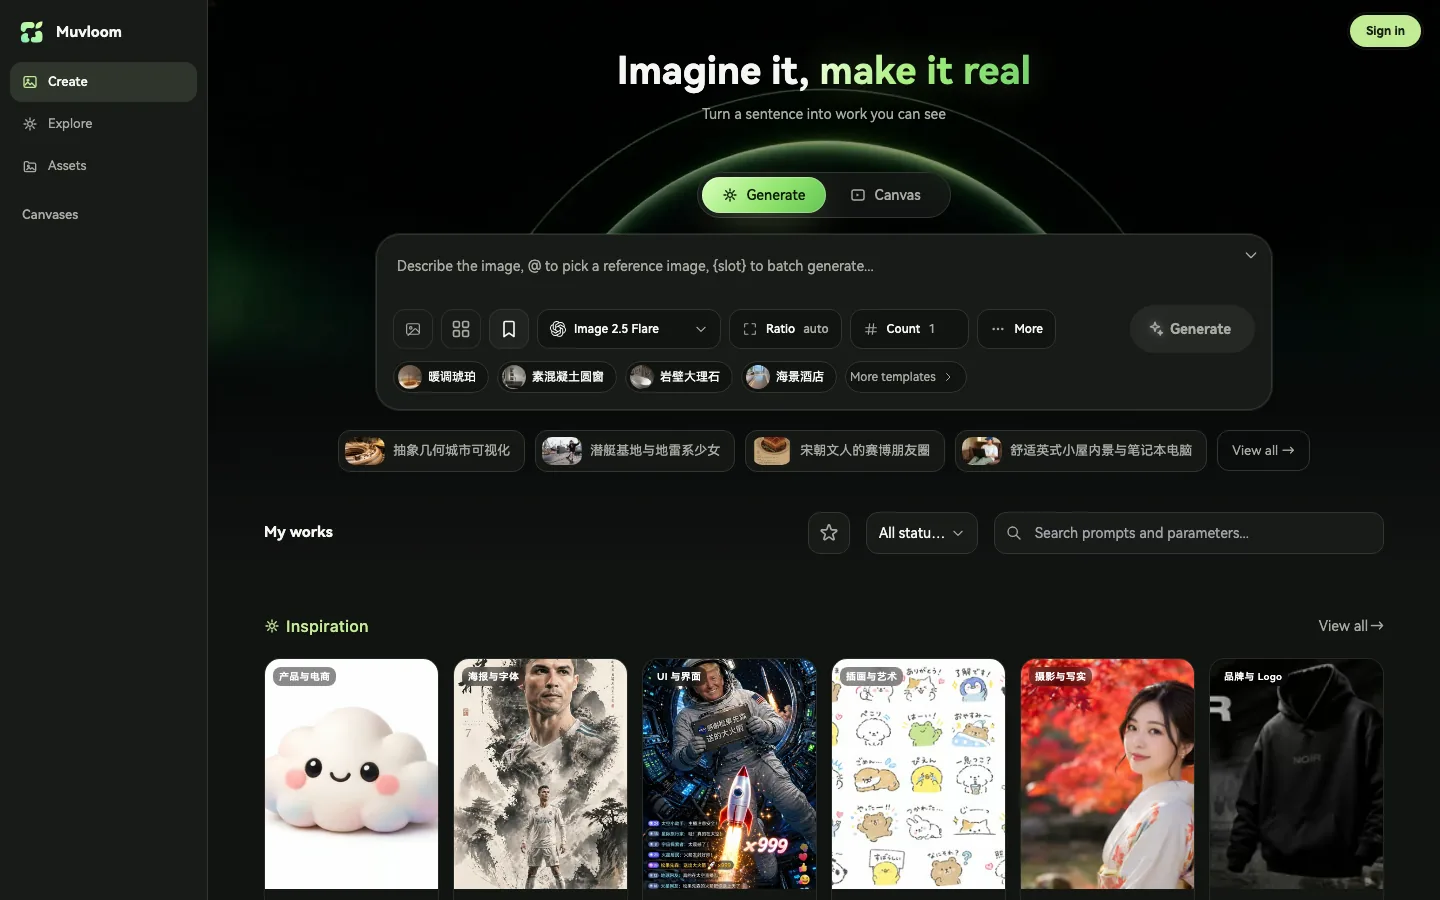
- 1Sidebar: the three entry points Create, Explore and Assets, with Canvases below them listing your recent canvas projects. On a phone they sit at the bottom of the screen.
- 2Generate / Canvas switch: Generate makes the image right away; Canvas opens a new canvas and hands your sentence to the AI agent.
- 3Input box: where the prompt goes. Use
@to reference an image and{slot}to batch generate. - 4Model: open the dropdown to choose which model generates the image.
- 5Parameters: Ratio (or Size) and Count; everything else is tucked under More.
- 6Generate button: click it to start, or simply press Enter.
- 7Inspiration chips: randomly suggested examples; one click drops their prompt and parameters into the input box.
- 8Works area: everything you generate lives under My works; until you have anything, Inspiration is shown here instead.
- 9Account area: signing in, credits (on sites that have them) and your personal menu are all in the top right.
2. Five-minute start
2.1 Generating your first image
- 1Open the Muvloom home page and make sure Generate is selected above the input box.
- 2Describe the picture you want in the input box, the more specific the better. For example:
A refreshing matcha latte on a wooden bar counter, silky fine milk foam, a few fresh mint leaves beside it, afternoon sunlight through the window, warm tones, commercial photography, 3:4 vertical composition
- 1(Optional) Click Ratio to choose an aspect ratio and Count to set how many images you want.
- 2Click Generate on the right, or simply press Enter.
- 3A new work card appears at the top of My works below, showing Queued... and then Generating...; the image arrives on its own.
2.2 Viewing, downloading and favoriting
Every work card has a row of buttons underneath, from left to right:
| Button | What it does |
|---|---|
| Add to favorites | Favorites this record; the star button Favorites only brings it back in one click. |
| Reuse config | Puts this prompt, its parameters and its reference images back in the input box so you can tweak and rerun. |
| Edit output | Uses the generated image as a reference and opens the mask editor for inpainting. |
| Send to canvas | Takes the image to a canvas to keep working on it. |
| Download image | Downloads the original file. When a record holds several images, all of them are downloaded. |
| Delete record | Deletes this record. |
Clicking the card itself opens the details: the large image, the full prompt, the reference images and the parameters, and you can copy the prompt from there. Click the large image for fullscreen, zoom with the wheel or two fingers, and move between images with ← →.
2.3 Not happy? Keep editing
AI images usually take a few rounds. Pick the route that matches the size of the change:
- The whole direction is off: click Reuse config, adjust the style, composition or color wording in the prompt and generate again.
- Mostly right, one spot is wrong: click Edit output, paint that spot and spell out what it should become. See Inpainting.
- You want to compare versions as you go: click Send to canvas, circle what should change and generate new versions beside it. See Canvas.
- You cannot put it into words: hand it to the AI agent — say what you need in plain language and it writes the prompt for you.
2.4 Signing in and keeping your work
You can open Muvloom, browse inspiration and organize assets without an account. Signing in is needed for: generating images or videos with the built-in models, opening cloud canvas projects, and using the agent to create assets and templates in bulk.
Works, assets and prompts made in this browser before you sign in are merged into your account the first time you sign in, with a “Recovered N items from before you signed in” message. After that, works, assets, prompts, templates and canvas projects are saved to the cloud, so the same account shows them on another device.
3. The Create page: one line, one image
The Create page is the home page, and it is built for “write a line, get an image”. This chapter goes through every button in the input box.
3.1 Writing a good prompt
A prompt is your description of the picture. One structure that works well:
Image type + subject + scene and environment + style + light and color + composition and ratio + text that has to appear
An e-commerce hero image for a new rose serum, a clear glass bottle with a gold cap in the center of the frame, rose petals and water droplets around it, refined premium texture, pink and rose gold palette, soft studio light, the headline reads “GLOW SERUM”
- The more specific the better: “a cat” is weaker than “a ginger short-haired cat lying on a windowsill in the sun”.
- Put text that has to appear in quotes — models write it far more accurately that way.
- Describe the style instead of naming a brand: “minimal, lots of white space, low saturation” works better than “like brand X”.
- Do not ask for contradictions, such as “minimal” and “packed with elements” in the same prompt.
The × in the top right of the input box is Clear prompt.
3.2 Reference images and @ mentions
With a reference image the model follows it, which is how you keep a product, a face or a layout consistent. There are three ways to add one:
- 1Click the image button at the bottom left of the input box and pick images from your device (several at once is fine).
- 2Copy an image, then press Ctrl / ⌘ + V in the input box to paste it.
- 3Drag image files anywhere onto the page and drop them when you see “Drop to add reference images”.
Reference images show as a row of thumbnails numbered in the bottom left corner. Typing @ in the prompt opens a menu, and picking an image inserts a mention such as @Image 1 — for example “put the cup from @Image 1 on the table in @Image 2”.
- Drag a thumbnail to reorder it; hover it and click the × in the corner to remove it.
- Right-click a thumbnail (long-press on a phone) to Insert reference or Save as asset.
- The
@menu also lists the assets you saved, and picking one brings in every view of that asset.
3.3 Batch generating with {slot}
Want to try several colors, styles or scenes in one go? Write a “slot” in curly braces:
- 1Write
{name}in the prompt, for example “a {color} cat sitting in a {place}”. The name cannot contain spaces. - 2It turns into a chip you can click; open it and type one value per line, such as “ginger”, “black”, “white”.
- 3Click Generate. Every combination is generated once and the button shows the total, for example Generate 6 images.
3.4 Models and parameters
The row of parameter buttons under the input box decides which model runs and what kind of image comes out:
| Parameter | What it means |
|---|---|
| Model | Open the dropdown to pick a model. Each one is good at different styles and supports different parameters; when in doubt keep the default. |
| Ratio / Size | Aspect ratio or exact resolution, see the next section. |
| Count | How many images this run produces, 1–10. |
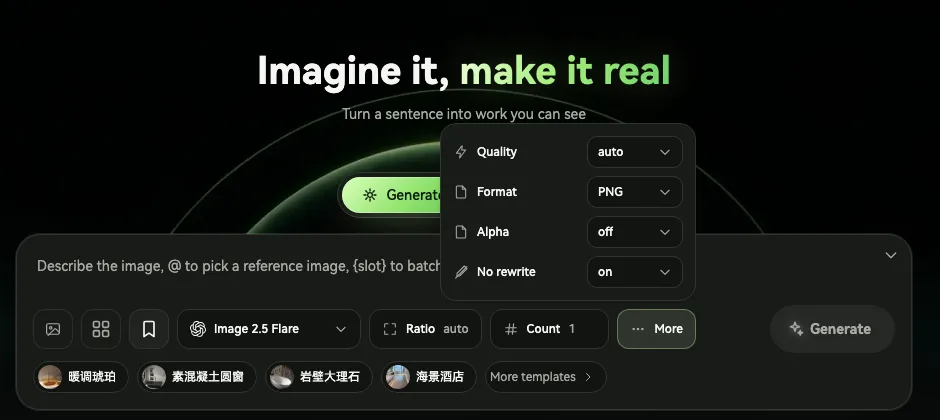
| Quality | Under More: auto / low / medium / high — higher quality is slower. |
| Format | Under More: PNG / JPEG / WebP. |
| Alpha | Under More: available when the format is PNG, and gives you assets on a transparent background. |
| Compression | Under More: adjustable for JPEG / WebP — the lower the value, the smaller the file. |
| No rewrite | Under More: on by default, and stops intermediate services from rewriting your prompt. |
3.5 Setting the size and aspect ratio
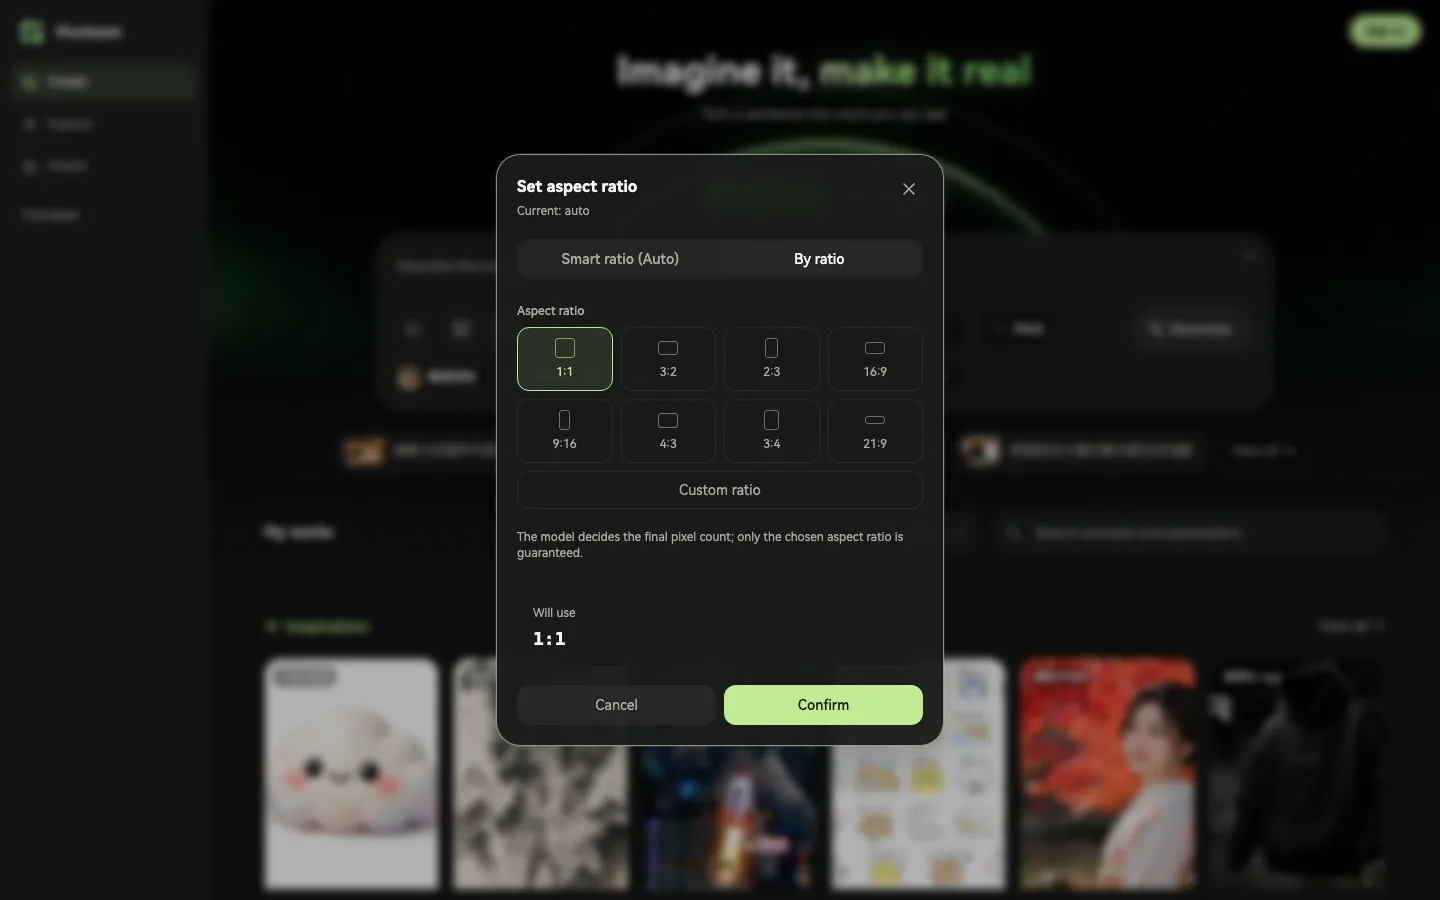
Click Ratio (or Size) to open the dialog. Which name the button shows depends on the model:
- Smart ratio (Auto) (called Auto in size mode): the model decides the size, which is what you want when you are unsure.
- By ratio: pick a common ratio such as 1:1, 3:4 or 16:9, or click Custom ratio and type a value like 5:4. Models that support exact resolutions also let you pick a Base resolution of 1K / 2K / 4K.
- Custom size: only shows up on models that accept exact sizes, and takes width and height in pixels.
| Use case | Recommended ratio |
|---|---|
| Product hero images, avatars, social posts | 1:1 |
| Feed covers, posters, phone wallpapers | 3:4, 2:3, 9:16 |
| Article headers, website banners, video thumbnails | 16:9, 21:9 |
3.6 Inpainting (mask editing)
Only one small part needs to change — a different color, one stray object gone? Mask editing repaints just the area you paint and leaves everything else untouched.
- 1Click Edit output on a work card, or the brush icon on a reference thumbnail, or right-click any image and choose Edit.
- 2In the “Edit mask” window, use Lasso to loop the area (it closes when you release) or Paint to brush it directly; Erase takes paint back off. Everything covered in blue is what gets repainted.
- 3Click Save. The image moves to the front of the reference row with a MASK badge, and the generate button becomes Edit mask.
- 4Spell out in the prompt what that area should become, for example “replace the cup with a pink ceramic mug”, then click Edit mask.
3.7 Templates and saved prompts
You do not have to retype the wording you use every day — Muvloom has two ways to reuse it:
- Saved prompts: with the prompt written, click the bookmark button Save as template in the input box and it is stored under Assets → Prompts together with the referenced assets and the size, quality and count. Type
/in the input box to call it back. - Templates: the row of round thumbnails under the input box are tuned looks. Click one and the model and size switch for you; attach your product asset with
@and you get an image in the same look. Click More templates to see them all.
3.8 Managing your works
- Filtering: the star button Favorites only; the status dropdown offers Completed, Generating and Failed; the search box matches prompts and parameters.
- Multi-select: hold Ctrl / ⌘ and click cards, or press on empty space and drag a selection box; on a phone swipe the cards sideways. A batch bar appears at the bottom for favoriting, downloading or deleting in bulk.
- When a run fails: open the details to see why. If content review rejected it, click Edit the prompt and reword it; for anything else click Retry task.
- Closing the page is fine: jobs on the built-in models keep running on the server and reattach when you refresh or come back.
4. The canvas: edit freely
The canvas is a whiteboard you can pan forever. Put several images side by side to compare them, circle and annotate right on an image to tell the AI what to change, and every new result lands next to the original so comparing is easy.
4.1 Creating and opening a canvas
- On the home page switch to Canvas, write a line and click Start creating: a new canvas project is created and your sentence goes to the AI agent.
- Hover the Canvases row in the sidebar and click + New canvas; click All to see every canvas project.
- Recent canvases are listed below in the sidebar — click a name to open it, or click ↗ for Open immersive, which collapses the sidebar.
- Click Send to canvas on a work card to bring an image you already made onto the current canvas.
Canvases save themselves. Once you are signed in, canvas projects sync to the cloud and open on any device.
4.2 Canvas basics
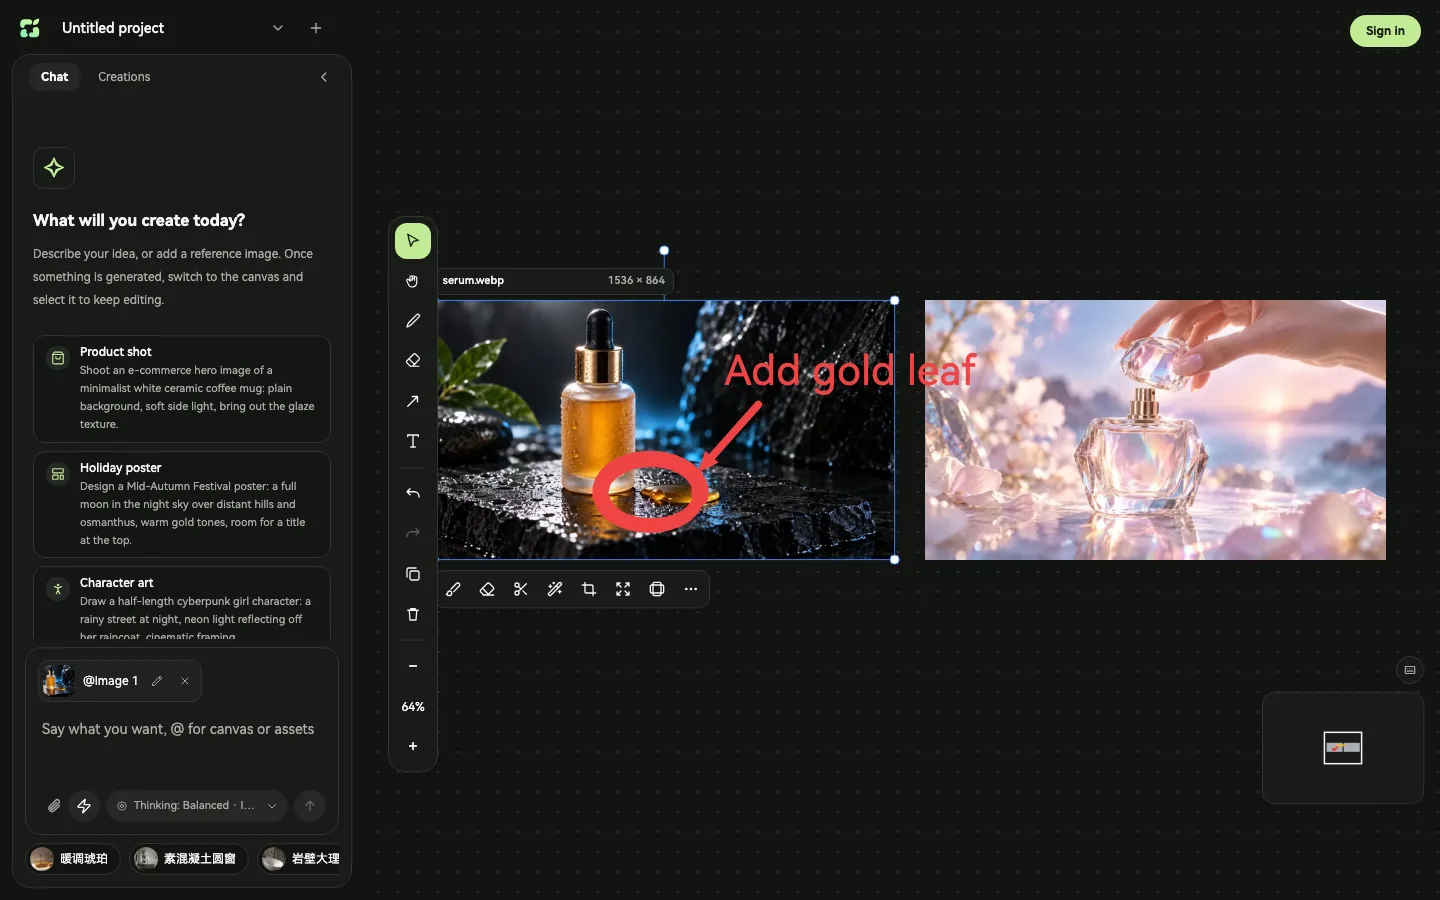
- 1Chat panel: where you talk to the AI agent; the Creations tab beside it lists everything made on this canvas.
- 2Agent input box: say what you want in one sentence;
@references images or assets on the canvas. - 3Toolbar: select, hand, pen, eraser, arrow and text, plus undo, redo and zoom.
- 4Annotations: circle what should change with the pen, then add an arrow and a text note.
- 5Image toolbar: appears once a single image is selected, and offers inpainting, erase, cut out and more.
To get images onto the canvas: click + Import reference images in the middle of an empty canvas, drag image files in, or press Ctrl / ⌘ + V.
Moving around: the wheel or a trackpad swipe pans, Ctrl / ⌘ + wheel zooms, and holding Space lets you drag the view. The minimap in the bottom right jumps anywhere quickly.
| Action | Shortcut |
|---|---|
| Select / hand | V / H |
| Pen / eraser | D / E |
| Arrow / text | A / T |
| Undo / redo | ⌘Z / ⌘⇧Z (use Ctrl on Windows) |
| Copy / paste / duplicate | ⌘C / ⌘V / ⌘D |
| Select all / add to selection | ⌘A / Shift + click |
| Delete the selection | Delete or Backspace |
| Zoom / temporary hand | ⌘ + wheel / hold Space and drag |
| Drag without snapping | hold ⌥ / Alt while dragging |
| Clear the selection | Esc |
4.3 Using annotations to point at what changes
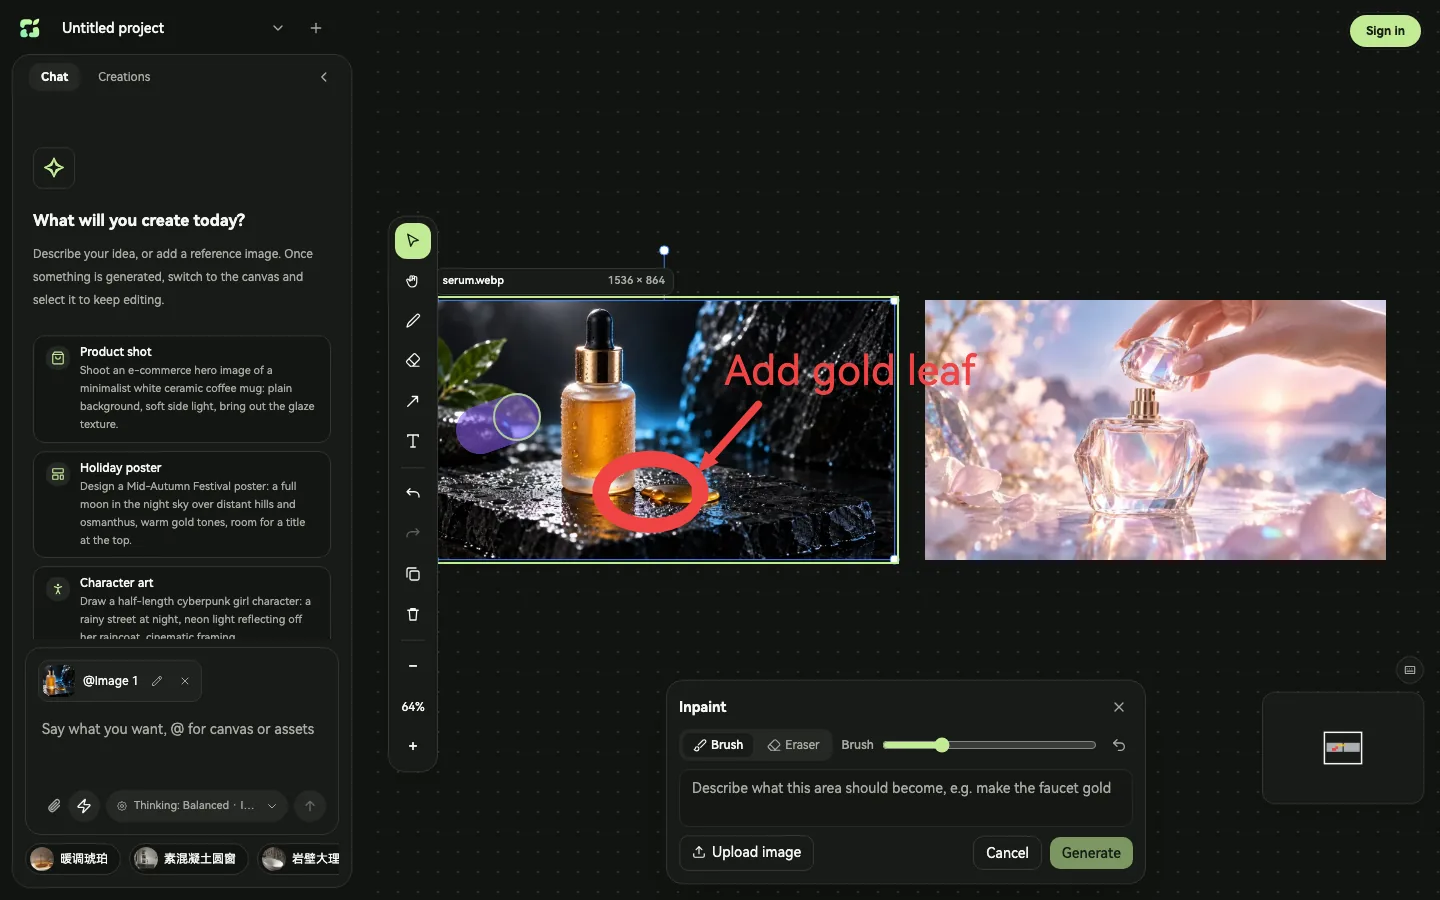
- 1Press D for the pen and circle the spot that should change (there is no ellipse tool — the circle is drawn with the pen).
- 2Press A to drag an arrow toward it, then press T and click to write a note such as “add a piece of gold leaf here”.
- 3Press V to go back to the select tool and click the image. The circles, arrows and text lying on top of it come along automatically.
- 4In the chat panel on the left say “follow the annotations”, or just describe what you want. The new result lands to the right of the original, which stays untouched.
The style panel in the top right changes annotation color, stroke width and font size.
4.4 The image toolbar: inpaint, erase, cut out, expand
Select a single image on the canvas and a row of buttons appears underneath it:
| Button | What it does | How to use it |
|---|---|---|
| Inpaint | Changes only the area you paint | Paint the area with the brush, spell out what it should become and click Generate. |
| Erase | Has the AI remove whatever is inside the painted area and fill the background back in | Paint over what should go and click Erase — no description needed. |
| Cut out | Removes the background and gives you a transparent PNG | One click. |
| Regenerate | Runs the same settings again | One click. |
| Crop | Cuts off what you do not need | Drag the frame handles and click Apply. Done locally, costs nothing. |
| Expand | Extends the picture outward | Drag the frame outward, optionally say what fills the new area, and click Generate. |
| More | View original, copy, download, delete | Right-clicking the image works too. |
4.5 Multi-select, batch generation and export
- Drag a selection box or hold Shift and click several elements, and the batch bar appears at the bottom.
- Batch generate N: one description runs once for every selected image, and each result lands beside its source. Handy for pushing a set of product shots into one style.
- Export N: a single item downloads directly, several are packed into one zip.
- A single image can also be right-clicked → Download image, which downloads the original file.
5. The AI agent
The chat panel on the left of the canvas is the AI agent. Say what you need in plain language and it reads the canvas, picks a suitable approach and writes the prompt, and only starts generating once you confirm. If prompts are still new to you, this is the place to start.
5.1 Talking to the agent
- 1Open a canvas and say what you want in the input box on the left, for example “make a Valentine’s Day poster for this perfume”.
- 2Need reference images? Click the paperclip or drag them in; images selected on the canvas come along automatically, annotations included.
- 3Press Enter to send. The assistant reads its skills, looks at the canvas and comes back with a draft prompt.
- Type
@to reference this turn’s images, images on the canvas, or your assets. - While the assistant is answering you can click Stop; anything you send meanwhile queues up and runs in order.
- The “Generation settings” button under the input box adjusts Thinking depth (fast / balanced / deep) plus the model and size.
5.2 Nothing is generated until you confirm
- 1Once the assistant has written the prompt, a draft card appears saying “Read the prompt below — you can edit it — then press Confirm and generate.”
- 2Check the prompt and the model and count at the bottom of the card; anything that looks off can be edited right there.
- 3Click Confirm and generate. Finished results land on the canvas, and clicking a thumbnail locates them there.
When several drafts are waiting at once, Confirm all submits them in one go.
5.3 Skills: professional recipes in one line
Skills are how-to guides for the agent. Type / at the start of the input box to open the skill menu:
| Skill | Good for |
|---|---|
| Product hero image | The image in a listing’s main slot, on white or in a scene |
| Product image set | A whole detail-page set in one run: hero, selling points, close-ups and scene shots, each with its own job |
| Posters and marketing assets | Posters or campaign key visuals with headline copy |
| Scene swap | Keeps the subject pixel for pixel and only puts it in a new background |
| Product restyle | Swaps the product, color or material inside one image while background and lighting stay put |
| Viral image remix | Recreates a popular image you like, with your own product in it |
| Image localization | Replaces the text in an image with another language, layout unchanged |
| Character sheet | A reusable three-view character sheet so every later image keeps the same look |
| Reverse prompt | Reads a reference image and writes a prompt that reproduces it |
| Create asset / create template | Turns the images you have into an asset, or saves a look you like as a template |
Video projects come with their own set: make an image move, storyboard shorts, product hero videos, review-style videos and brand films.
5.4 Helping the agent understand you
- Lead with the goal and where it will be used: “for a marketplace listing thumbnail” or “for an Instagram post” is worth far more than “make a nice picture”.
- Change one thing at a time: settle the overall style first, then work through the details.
- Lean on reference images and annotations: circling and pointing is more precise than describing.
- Answer the assistant’s questions carefully: it offers a few directions to choose from, and Other… lets you write your own.
6. Video
6.1 Making an image move
- Right-click any image, or use the top-right menu in the fullscreen viewer, and choose Make video. A video canvas is created with that image as the first frame.
- You can also pick the video type when creating a project, then select an image on the video canvas and describe the motion and camera move.
- One selected image becomes the first frame; with two, the left one is the first frame and the right one the last. When the model supports reference images, several images can act as references — refer to them as “Image 1, Image 2” in the description.
6.2 Video parameters
Video has three parameters — Duration, Aspect ratio and Resolution — defaulting to 5 seconds, 16:9 and 720p. Models differ in what they support:
| Model | Duration (s) | Aspect ratio | Resolution |
|---|---|---|---|
| Grok | 5 / 8 / 10 / 15 | 16:9, 9:16, 1:1 | 720p / 1080p |
| Seedance 2.0 | 5 / 8 / 10 / 15 | 16:9, 9:16, 1:1 | 720p / 1080p |
| Agnes 2.5 Flash | 5 / 8 / 10 | 16:9, 9:16, 1:1 | 720p |
| Veo 3.1 Fast / Lite | 4 / 6 / 8 | 16:9, 9:16 | 720p / 1080p |
6.3 Extending, editing and exporting a film
- Select a clip and its toolbar offers Download, Regenerate, First frame, Last frame and Add to timeline.
- Extend: adds 2–10 seconds after the last frame; Edit: keeps the shot and changes the content.
- Once several clips are on the timeline with Add to timeline, trim their in and out points and then Export film (up to 8 clips and 3 minutes; keep the page in the foreground while it exports).
7. Exploring inspiration
7.1 Browsing and searching
Click Explore in the sidebar for the best examples other people made, each one with its full prompt.

- Filter by model at the top: All, GPT Image, Nano Banana 2.
- Pick a category on the left, or search by title, prompt or tag in the search box.
- Hover a card to read its prompt; the star button Pin keeps the ones you like at the front.
7.2 Borrowing an idea in one click
- 1Click any card to open the details, where you can view the original image and Copy the full prompt.
- 2Click Use this prompt: the prompt, its parameters and its reference images go into the home input box, and the recommended model is selected wherever possible.
- 3Swap the subject in the prompt for your own and click Generate.

8. Assets: subjects, prompts and templates
Click Assets in the sidebar for the things you saved yourself, split across four tabs: Projects, Assets, Prompts and Templates.
8.1 Projects
Every canvas project lives here and can be searched, renamed and deleted. Once you are signed in with sync on, deleted projects go to the bin first and can be restored during the retention window.
8.2 Assets: the products and people you use often
An asset is “a group of images of one subject”: the front, side and close-up of a product, or several photos of the same person. Once saved, it goes into your reference images in one click.
- 1Click New asset and drag one or more images of the same subject into the “Images” area.
- 2Fill in the name (20 characters at most), set the kind to “Product” or “Person”, and click Save.
- A faster route: right-click a reference thumbnail in the input box → Save as asset; or drag images straight onto the Assets tab.
- To use one: Add reference on the asset card puts it in the reference row; or type
@in the input box and pick the asset.
8.3 Prompts
Every prompt saved with Save as template on the Create page is here, together with the assets and parameters it references. Apply puts it back in the input box, and typing / in the input box searches them directly.
8.4 Templates: the same look in one click
A template is a tuned “look”: a particular light, scene and layout. Drop your product assets into one and you get a batch of images in the same style.
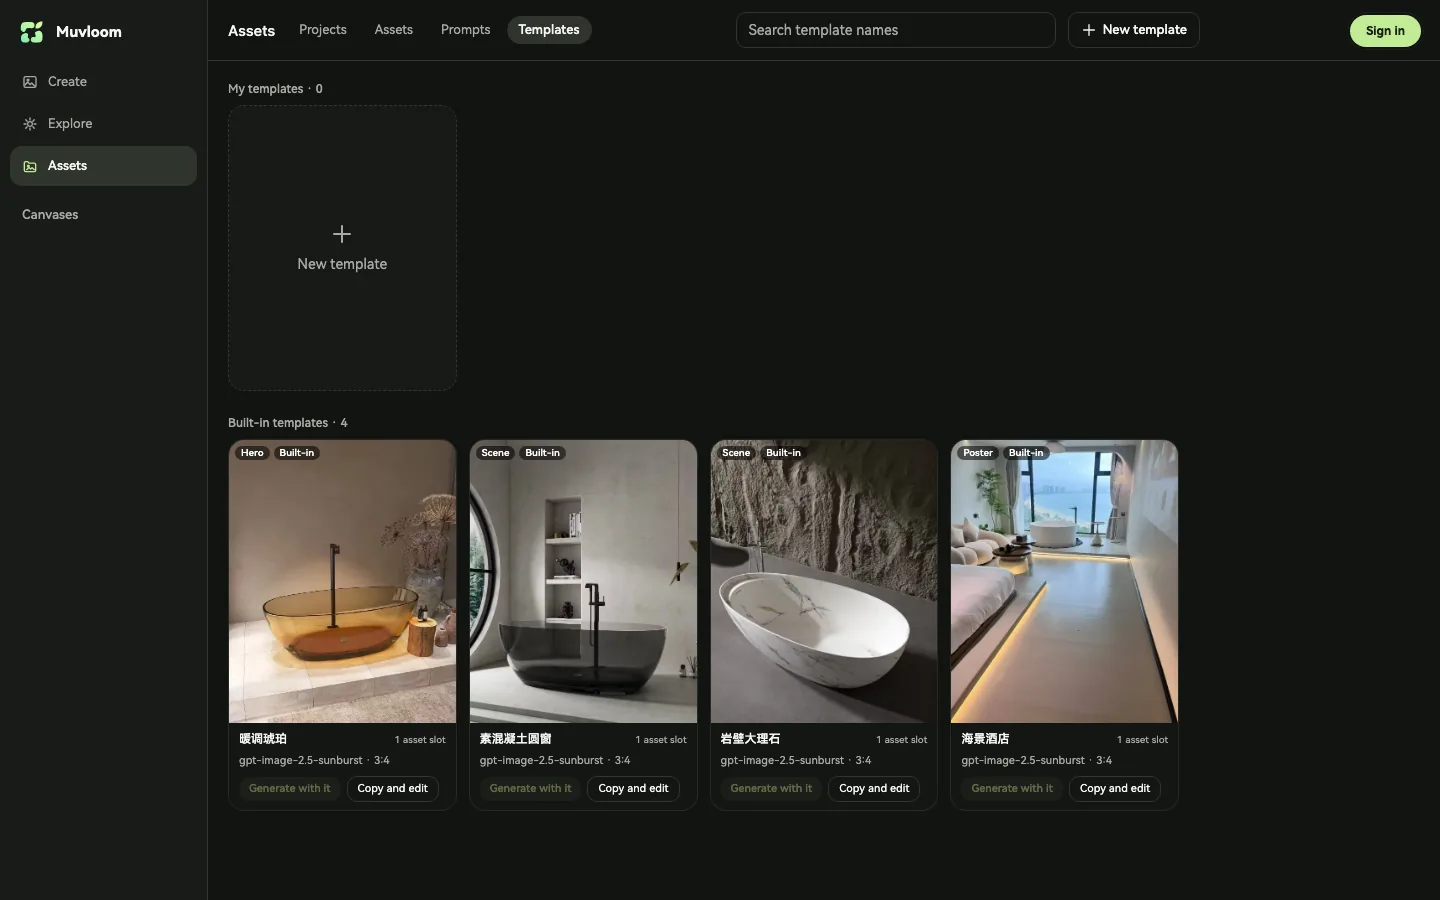
- Built-in templates can be used as they are; click Copy and edit to change one.
- New template: drop in a poster or shot you want to reproduce, give it a name and pick a purpose (hero / poster / scene / detail). The agent can build one for you too.
- Generating with it: choose the assets to feed in (they have to be of the “Product” or “Person” kind), set how many images per entry, and submit the batch.
9. Account, data and settings
9.1 Signing in and signing up

- Click Sign in in the top right and use a third-party account or an email and password.
- No account yet? Click Sign up: enter your email and a password of at least 8 characters, then the 6-digit code sent to your inbox.
- Once signed in, the avatar menu → Account settings lets you set or change the password and link third-party accounts.
9.2 Where your data lives
| What | Where it is kept |
|---|---|
| Works, assets, prompts, templates, canvas projects, preferences | Synced to the cloud once you sign in and visible on every device; kept in this browser only while signed out |
| API keys you configured yourself | This browser only, never uploaded |
| Interface language, theme | This browser only |
A small yellow dot on your avatar means changes are still waiting to be saved. Settings → Data shows the save status, and Retry now pushes again after a failure; saving also resumes on its own once the network is back, so local data is never lost.
Settings → Data also exports and imports a ZIP backup, or clears the data in this browser (clearing cannot be undone, so export first).
9.3 Credits and quotas
On sites with credits enabled, the balance available to you is shown in the top right:
- Every run deducts credits up front based on the model and the number of images (videos by the second); failed or canceled jobs give them back.
- When credits run out the generate button is disabled, hovering it shows how many you are short, and Top up credits sits right beside it.
- Clicking the balance or the avatar menu opens Account overview, Credit history, plans and referral rewards.
9.4 Settings worth knowing
- Language and theme: Language (中文 / English) and Theme (light / dark / system) in the avatar menu.
- Habits: Settings → General changes the submit shortcut, Clear the input after submitting, Restore the last input on restart and more.
9.5 Using your own API key
When a site allows your own keys, Settings has an API tab where you can plug in your own model service:
- 1Open Settings → API and pick New profile in the “Current profile” dropdown.
- 2Set Provider type to “OpenAI-compatible API” or “Gemini”, then fill in API URL and API Key.
- 3Model ID can be filled in by clicking Fetch models, or typed by hand. Closing the dialog saves automatically.
10. Going further
10.1 From idea to delivery
- 1Think it through: where it will be used, who sees it, which style, and what text has to appear.
- 2Draft: write a detailed prompt, generate 2–4 images in one run and keep the one closest to your direction.
- 3Refine: work the details with inpainting, canvas annotations or the agent, one change at a time.
- 4Scale it up: batch generate with slots and templates, or ask the agent for a whole set with the product image set skill.
- 5Deliver: set the ratio you need, then download the originals or export in bulk.
10.2 Getting the most from reference images
- Real product photos: keep the generated product true to the real thing, and save them as an asset to reuse.
- Style references: let the AI pick up the palette and texture, and say so in the prompt — “follow the color tone of @Image 2”.
- Composition references: pin down the layout, which is how a poster series stays consistent.
- The sharper the reference and the clearer its subject, the better the result.
10.3 Tips for e-commerce images
- Let the hero image show the product itself; decoration should never outshine it.
- Boil the selling points down to 3–5 keywords and put them in the text part of the prompt.
- Use the ratio the platform asks for (1:1 for hero images, 3:4 for detail pages) and leave a safe margin.
- Generate a few versions of the same brief and keep whichever performs better.
Common questions
The sign-in dialog opened when I clicked Generate and nothing was generated?
The built-in models require an account. After signing in the page reloads with your text and earlier works intact, so click Generate once more.
The reference image button is grayed out and I cannot add an image?
The current model has no support for reference images (image-to-image). Pick a model in the dropdown that does. Reference images are also capped at 16, each under 10MB.
I cannot find the transparent background or compression option under More?
These options follow the model and the format: alpha only appears when the format is PNG, compression only for JPEG or WebP, and Gemini models expose a different set of parameters.
What do I do about the “at most 16 images per submission” message?
Your slot combinations multiplied by the count went past 16. Remove some slot values or lower the count, and run it in a few passes.
The inpaint, erase and expand buttons are grayed out?
These need a model with mask support (the GPT Image family), and the image cannot be too small or too elongated. Hover the button to see the exact reason.
Why did nothing generate after I messaged the agent?
The agent drafts the prompt first and waits for you to press Confirm and generate. To skip the confirmation, turn on direct generation mode next to the input box, but it spends credits right away.
The canvas eraser wiped out my whole image?
The toolbar eraser deletes any element it touches; press Ctrl/⌘ + Z to undo. To have the AI remove an object inside an image, select the image and use Erase on its toolbar.
Where did Save as template put my prompt?
It is saved on the Assets page, in the Prompts tab, and typing / in the input box brings it back. The Templates tab holds the tuned looks, which are a different thing.
Generation failed with a content review error?
Retrying the same prompt fails the same way. Open the work details, click Edit the prompt and word it differently.
If I close the tab, are jobs in progress lost?
Jobs on the built-in models keep running on the server and reattach when you open the page again. Jobs using your own API key are requested by the browser directly, so closing the page interrupts them.
I switched computers, are my works still there?
Sign in with the same account to see the works, assets, prompts, templates and canvas projects saved in the cloud. Data made while signed out stays in the original browser and is merged into your account when you sign in.