 Muvloom
User guideGetting started
Contents
Chapter 01
Getting started
Learn the interface, generate your first image, then review, download and refine it.
Interface overview
The Create page is the Muvloom home page. It consists of the following areas:
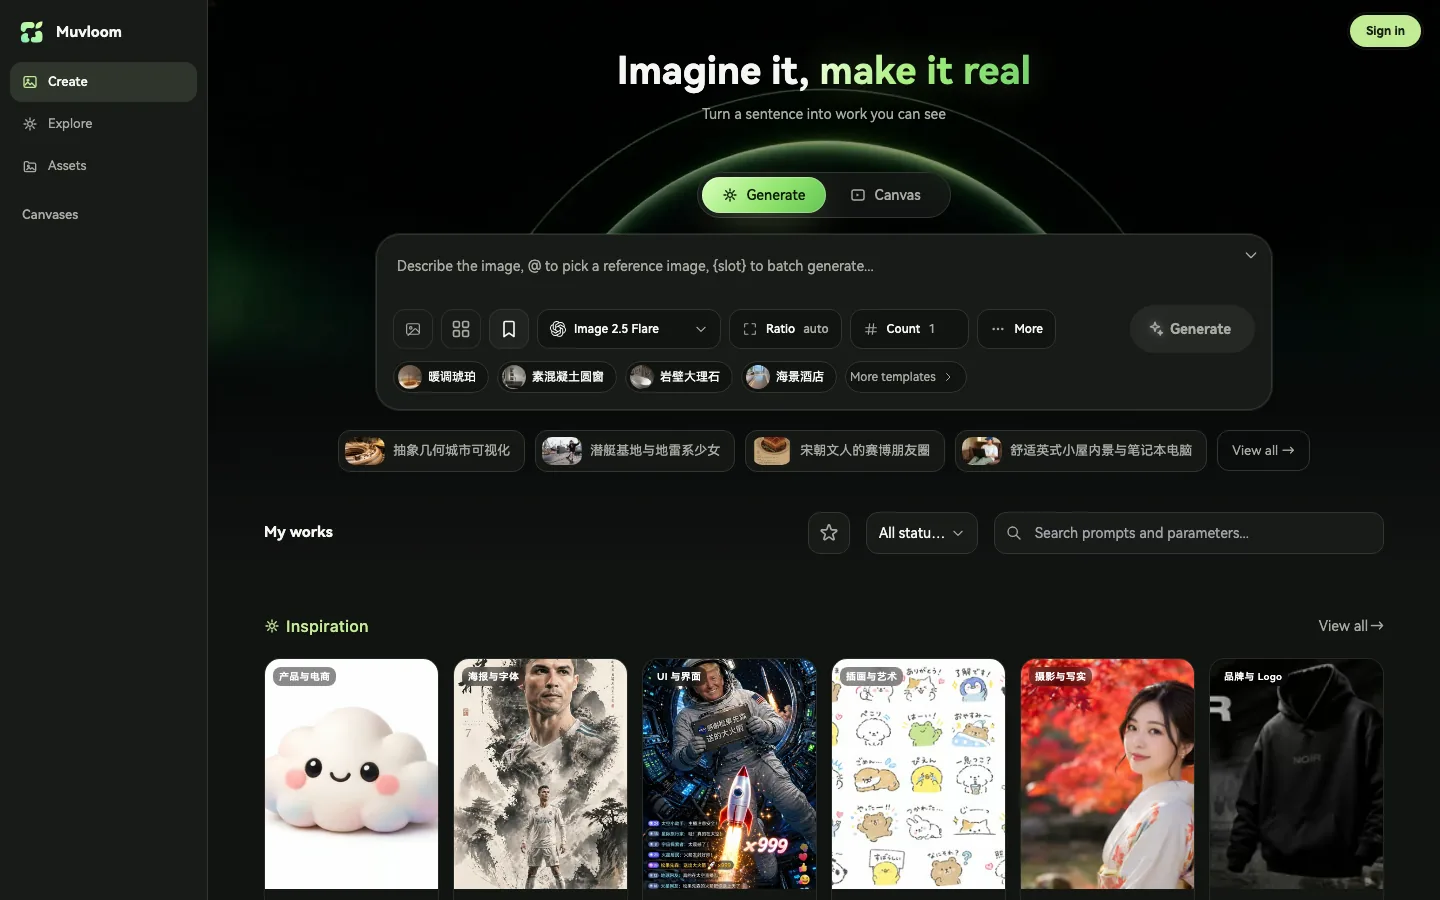
- 1Sidebar: the Create, Explore and Assets entry points, followed by your recent canvas projects. On mobile these move to a bottom tab bar.
- 2Mode: Generate produces images directly; Canvas opens a new canvas project and passes your request to the AI agent.
- 3Prompt box: enter your prompt here. Use
@to reference images and{slot}for batch generation. - 4Model: the model used for generation.
- 5Parameters: Ratio (or Size) and Count; further options are under More.
- 6Generate: submits the job. Shortcut: Enter.
- 7Inspiration: example prompts; click one to load its prompt and settings.
- 8Works: results appear under My works. Until you have any, Inspiration is shown instead.
- 9Account: sign-in, your credit balance (where enabled) and the account menu.
Generate your first image
On the home page, make sure Generate is selected above the prompt box, then describe the image, for example:
A matcha latte on a wooden bar counter, fine milk foam, fresh mint leaves beside it, soft afternoon light through the window, warm tones, commercial photography, 3:4 portrait
- 1Set Ratio and Count as needed.
- 2Click Generate or press Enter.
- 3The job appears at the top of My works, moving through Queued... and Generating... until the result is shown.
Review and download
Each work card provides the following actions:
| Action | Description |
|---|---|
| Add to favorites | Favorite the work; filter with Favorites only. |
| Reuse config | Load the prompt, parameters and reference images back into the prompt box. |
| Edit output | Use the result as a reference and open the mask editor for inpainting. |
| Send to canvas | Continue editing the image on a canvas. |
| Download image | Download the original file; works with several images download them all. |
| Delete record | Delete the work. |
Click a card to open its details: the full-size image, prompt, reference images and parameters. Click the image for a fullscreen preview with zoom, and use ← → to switch images.
Refine the result
Choose an approach based on the scope of the change:
| Scope | Recommended approach |
|---|---|
| Overall style or composition | Click Reuse config, adjust the prompt and regenerate. |
| A specific detail | Click Edit output, paint the area and describe the change. See Inpainting. |
| Comparing versions | Click Send to canvas, annotate the image and generate alongside it. See Canvas. |
| Hard to describe in words | Let the AI agent interpret your request and write the prompt. |
Account and sync
You can browse and organize assets without an account. Generating with built-in models and opening cloud canvas projects require signing in.
Works, assets and prompts created in this browser before signing in are merged into your account on first sign-in. Once signed in, works, assets, prompts, templates and canvas projects sync to the cloud and are available on any device.
FAQ
Why are transparent background or compression missing from More?
Available options depend on the model and format: transparency requires PNG, compression requires JPEG or WebP, and Gemini models expose a different set of parameters.
Why are Inpaint, Erase and Expand disabled?
They require a model with mask support (GPT Image family), and the image cannot be too small or too elongated. Hover the button to see the exact reason.
An image on the canvas was deleted by the eraser. How do I restore it?
The toolbar eraser deletes any element it touches; press Ctrl/⌘ + Z to undo. To remove an object inside an image, select the image and use Erase on the image toolbar.
Generation failed content review. What should I do?
Retrying the same prompt will fail again. Open the work details, click Edit the prompt and revise the description.
Do running jobs stop if I close the page?
Jobs on built-in models run on the server and resume automatically when you return.